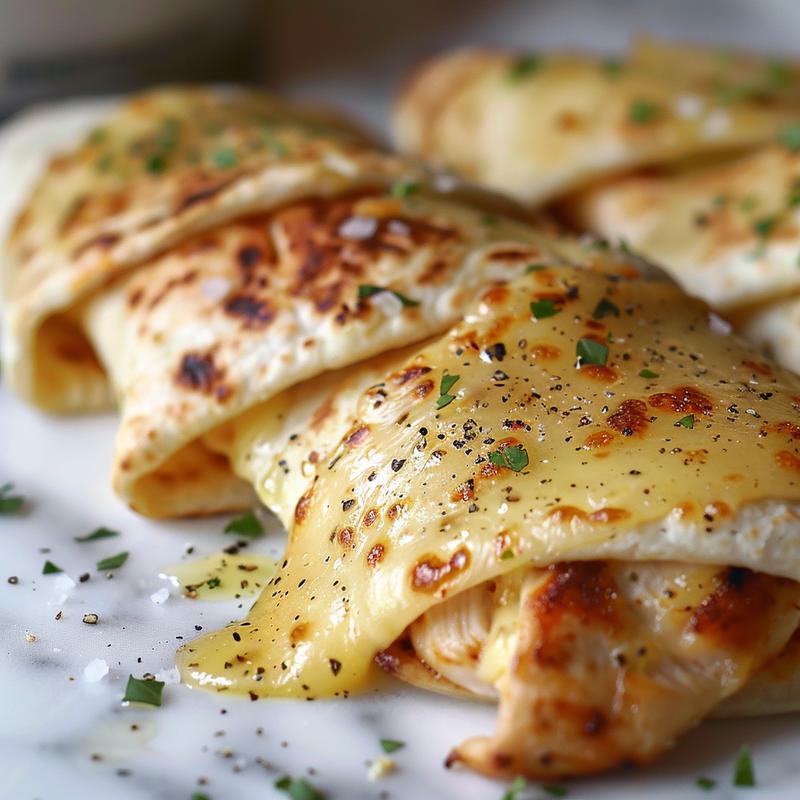
Hello there, friend! Pull up a chair, dim the lights, and let’s talk comfort food. I’m Elly, and I believe in the magic of simple ingredients transformed into something truly special. Today, we’re diving into a recipe that’s close to my heart: Ooey-Gooey Cheesy Garlic Chicken Wraps. These aren’t just wraps; they’re warm hugs wrapped in tortillas, perfect for a cozy night in or a quick, satisfying meal.
Imagine the aroma of garlic sizzling in olive oil, tender chicken mingling with melted cheese, all nestled in a warm, crispy tortilla. Sounds dreamy, right? Well, let’s make that dream a reality. This recipe is all about ease, flavor, and that comforting feeling you get when you bite into something truly delicious. So, grab your apron, and let’s get cooking!
Why You’ll Absolutely Love These Cheesy Garlic Chicken Wraps
These wraps aren’t just easy to make; they’re incredibly satisfying. Here’s why I think you’ll fall in love with them:
- Quick & Easy: From start to finish, these wraps come together in under 30 minutes. Perfect for busy weeknights!
- Customizable: Want to add some spice? Go for it! More cheese? Absolutely! This recipe is a blank canvas for your culinary creativity.
- Comfort Food at Its Finest: There’s something undeniably comforting about warm, cheesy goodness wrapped in a crispy tortilla. It’s a hug in every bite.
- Crowd-Pleaser: Whether you’re feeding a family or hosting friends, these wraps are always a hit.
- Versatile: Enjoy them for lunch, dinner, or even a late-night snack. They’re perfect any time of day.
Ingredients You’ll Need
Here’s what you’ll need to create these delightful wraps. Don’t worry, the list is short and sweet:
- Chicken: Cooked and diced. About 1.5-2 cups of cooked chicken, whether it’s grilled, baked, or sautéed.
- Salt & Pepper: To taste. These are your essential seasonings to bring out the flavor of the chicken.
- Olive Oil: 1 tablespoon. For sautéing the garlic and adding a touch of richness.
- Minced Garlic: 2-3 cloves, depending on your love for garlic. Freshly minced is always best!
- Cheese: 1 cup shredded cheese. A mix of cheddar and mozzarella works wonderfully, but feel free to experiment! You get a lovely stretch and flavor with this combination.
- Tortillas: 4-6 large tortillas. Flour tortillas are my go-to for their soft texture and ability to hold the filling.
- Butter: 2 tablespoons. For browning the wraps to golden perfection.
- Chopped Parsley: Optional, for garnish. Adds a pop of freshness and color.
Step-by-Step Instructions: Let’s Make Wraps!
Ready to get started? Here’s how to bring these cheesy garlic chicken wraps to life:
- Prepare the Chicken: Start by cooking the chicken if you have not already. Season it lightly with salt and pepper and either bake, sauté, or grill until done. Dice into small bite-sized pieces and set aside. The chicken is the heart of this dish, so make sure it’s cooked to perfection.
- Sauté the Garlic: In a pan over medium heat, warm the olive oil. Add the minced garlic and sauté just until golden and fragrant, around thirty seconds to one minute. Be careful not to burn the garlic, as it can become bitter. The pan needs to be hot enough to sizzle.
- Combine Chicken and Cheese: Remove from heat and stir in both cheeses while the chicken is still hot. This helps the cheese start melting before it goes into the wrap. If you want a really gooey wrap, add a little extra cheese!
- Assemble the Wraps: Lay a tortilla flat and spoon a generous portion of the cheesy garlic chicken mixture into the center. Fold in the sides and roll it tightly like a burrito. Make sure the filling is evenly distributed.
- Brown the Wraps: In a skillet, melt the butter over medium heat. Place the wraps seam-side down and press gently. Cook each side for two to three minutes or until golden brown and crispy. Flip carefully to avoid spilling any filling. It’s important to keep an eye on the pan to prevent burning.
- Rest and Slice: Once all wraps are cooked, remove from the skillet and let them rest for one to two minutes before slicing. This allows the cheese to settle and prevents it from oozing out too much when you cut into it.
- Garnish and Serve: Sprinkle chopped parsley over the top if desired, and serve warm. Enjoy the cheesy, garlicky goodness!
Pro Tips for Perfect Wraps
Want to take your wraps to the next level? Here are a few of my favorite pro tips:
- Don’t Overfill: Resist the urge to stuff your wraps to the brim. Overfilling can make them difficult to roll and more likely to spill.
- Warm the Tortillas: Warming the tortillas slightly before filling them makes them more pliable and less likely to tear. You can do this in a dry skillet or microwave.
- Use a Good Quality Non-Stick Pan: This will prevent the wraps from sticking and burning while browning.
- Press Gently: When browning the wraps, press them gently with a spatula to ensure even contact with the pan.
- Let Them Rest: Allowing the wraps to rest for a minute or two after cooking helps the cheese set and prevents them from being too messy to eat.
Common Mistakes to Avoid
Even the simplest recipes can have pitfalls. Here are a few common mistakes to watch out for:
- Burning the Garlic: Burnt garlic is bitter and unpleasant. Keep a close eye on it while sautéing and remove it from the heat as soon as it turns golden.
- Overcooking the Chicken: Overcooked chicken can be dry and tough. Make sure to cook it just until it’s done.
- Using Cold Cheese: Using cold cheese can prevent it from melting properly. Make sure to bring the cheese to room temperature before using it.
- Not Sealing the Wraps Properly: If the wraps aren’t sealed properly, the filling can spill out while cooking. Make sure to fold in the sides and roll them tightly.
- Overbrowning the Wraps: Overbrowning can make the wraps dry and brittle. Keep a close eye on them while cooking and flip them as soon as they turn golden.
Variations: Spice It Up!
The beauty of this recipe is its versatility. Here are a few variations to try:
- Spicy Chicken Wraps: Add a pinch of red pepper flakes or a dash of hot sauce to the chicken mixture for a spicy kick.
- Veggie-Packed Wraps: Add some chopped veggies like bell peppers, onions, or spinach to the chicken mixture for extra nutrients and flavor. With spinach, you get a boost of iron and vitamins.
- BBQ Chicken Wraps: Use BBQ sauce instead of olive oil and garlic for a smoky, sweet flavor.
- Buffalo Chicken Wraps: Toss the chicken in buffalo sauce for a tangy, spicy twist.
- Gnocchi with Spinach and Feta Wraps: Add some cooked gnocchi, spinach, and feta cheese to the chicken mixture for a Mediterranean-inspired wrap. Gnocchi with spinach is a great combination.
Storing Leftovers
If you happen to have any leftovers (though I doubt you will!), here’s how to store them:
- Refrigerate: Store the wraps in an airtight container in the refrigerator for up to 3 days.
- Reheat: Reheat the wraps in a skillet over medium heat or in the microwave. If using a skillet, add a little butter to prevent sticking.
Frequently Asked Questions
Got questions? I’ve got answers!
- Can I use pre-cooked chicken? Absolutely! Pre-cooked chicken is a great time-saver. Just make sure it’s heated through before adding the cheese.
- Can I use different types of cheese? Of course! Feel free to experiment with your favorite cheeses. Cheddar, mozzarella, Monterey Jack, and pepper jack all work well.
- Can I make these wraps ahead of time? You can assemble the wraps ahead of time, but I recommend cooking them just before serving for the best texture.
- Can I freeze these wraps? I don’t recommend freezing these wraps, as the tortillas can become soggy when thawed.
- If you are looking for a quick meal, this is it!
Serving Suggestions: Complete the Meal
These cheesy garlic chicken wraps are delicious on their own, but here are a few serving suggestions to complete the meal:
- Side Salad: A simple green salad with a light vinaigrette provides a refreshing contrast to the richness of the wraps.
- Sweet Potato Fries: Crispy sweet potato fries are a delicious and satisfying side.
- Coleslaw: Creamy coleslaw adds a tangy and crunchy element to the meal.
- Soup: A warm bowl of tomato soup or chicken noodle soup is perfect for a cozy night in.
And there you have it, my friend! Ooey-Gooey Cheesy Garlic Chicken Wraps that are sure to bring a smile to your face. I hope you enjoy making and eating these as much as I do. Remember, cooking is all about having fun and creating something delicious with love. Happy cooking!
Craving more cozy recipes? Check out my healthy garlic parmesan chicken pasta or my creamy garlic cheesy chicken potatoes! You’re going to love them!


Ooey-Gooey Cheesy Garlic Chicken Wraps
Ingredients
Method
- Cook chicken, season with salt and pepper, and dice.
- Sauté garlic in olive oil until fragrant. Add chicken and toss.
- Remove from heat and stir in cheese until melted.
- Lay tortilla flat, spoon in chicken mixture, fold sides, and roll tightly.
- Melt butter in skillet, cook wraps seam-side down until golden brown and crispy.
- Let wraps rest for 1-2 minutes before slicing.
- Sprinkle with parsley and serve warm.
Notes
Loved this recipe? Save it to your favorite Pinterest board so you can easily find it later! ✨