
Welcome to the Cozy World of Banana Bread
There’s something inherently comforting about the warm, sweet aroma of banana bread wafting through your kitchen. This delightful treat, often associated with childhood memories and family gatherings, brings a sense of nostalgia that many of us cherish. In this comprehensive guide, we will explore a remarkable recipe for Healthy Cinnamon Roll Banana Bread Bars with a luscious peanut butter glaze, a perfect fusion of two beloved treats. This recipe not only satisfies your sweet tooth but also incorporates wholesome ingredients, making it an excellent choice for breakfast or an afternoon snack.
Whether you’re a seasoned baker or a newcomer to the kitchen, this guide will provide you with all the tips and techniques you need to create a batch of banana bread bars that are both delicious and nutritious. Let’s dive in!
Why You’ll Love This Recipe
- Wholesome Ingredients: Made with ripe bananas, oat flour, and natural sweeteners, these bars are a guilt-free indulgence that you can feel good about.
- Quick and Easy: With minimal prep time and no fancy gadgets required, this recipe is perfect for busy mornings or spontaneous baking sessions.
- Customizable: You can easily adapt this recipe by adding chocolate chips, nuts, or dried fruits to suit your taste preferences.
- Perfect for Meal Prep: These bars can be made in advance and stored, making them an excellent option for meal prepping your week’s snacks.
- Allergy-Friendly: This recipe can be made vegan and gluten-free by substituting ingredients as needed, making it suitable for a variety of dietary needs.
Ingredients Breakdown
Let’s take a closer look at the ingredients needed to make these Healthy Cinnamon Roll Banana Bread Bars. Each component plays a vital role in achieving the perfect texture and flavor.
- 1 ripe banana: The star of the recipe, ripe bananas add natural sweetness and moisture.
- ½ cup peanut butter: This ingredient provides healthy fats and protein, contributing to the bars’ creamy texture.
- 2 tablespoons honey or maple syrup: Either sweetener will enhance the flavor while keeping the bars naturally sweet.
- 1 egg: Acts as a binding agent, helping the bars to hold together.
- 1 teaspoon vanilla extract: Adds depth of flavor and a touch of sweetness.
- ¾ cup oat flour: A healthier alternative to all-purpose flour, it gives the bars a wholesome texture.
- ¼ teaspoon baking powder: Ensures the bars rise and have a light texture.
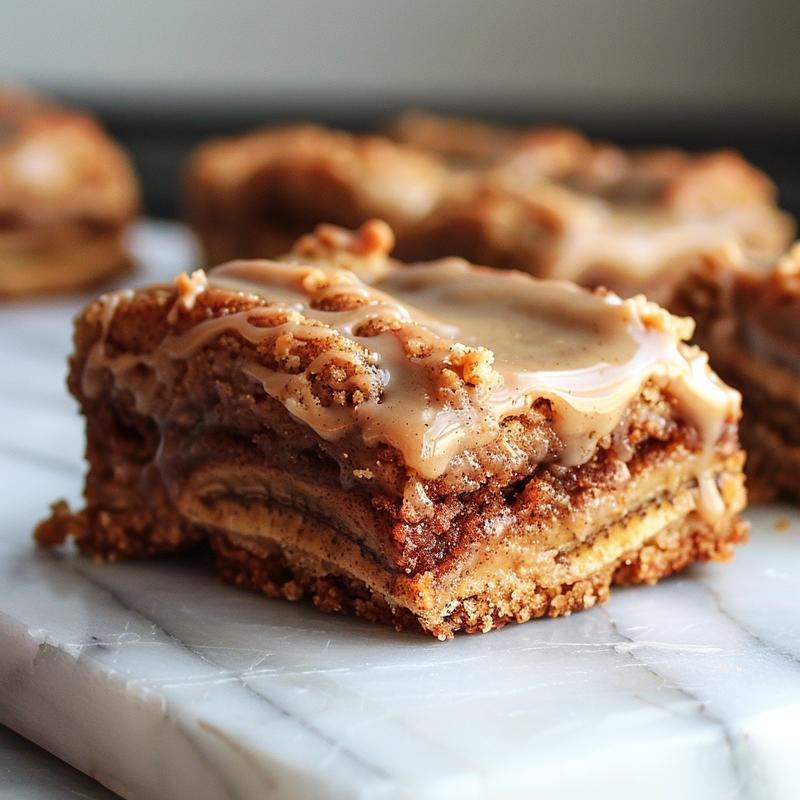
- ½ teaspoon cinnamon: Infuses the bars with warm, comforting spice, reminiscent of cinnamon rolls.
- 2 tablespoons peanut butter (for the glaze): Drizzled on top for that extra indulgent touch.
- 1 tablespoon honey or maple syrup (for the glaze): Sweetens the glaze, making it irresistible.
Step-by-Step Instructions
Follow these simple steps to create your banana bread bars:
- Step 1: Prep and Preheat: Preheat your oven to 350°F (175°C) and line an 8×8 baking dish with parchment paper, leaving some overhang for easy removal.
- Step 2: Mash Your Banana to Perfection: In a large bowl, mash that beautiful ripe banana until it’s mostly smooth with just a few tiny lumps.
- Step 3: Create Your Wet Mixture: Stir in peanut butter, honey, egg, and vanilla extract until everything looks creamy and unified.
- Step 4: Fold in the Dry Magic: Gently fold in oat flour, baking powder, and cinnamon until just combined.
- Step 5: Spread and Smooth: Transfer the batter to your prepared dish and spread evenly using a spatula or the back of a spoon.
- Step 6: Bake to Golden Perfection: Bake for 18-20 minutes until the edges are golden and the center feels set when lightly touched.
- Step 7: Glaze and Slice: While the bars cool slightly, whisk together your glaze ingredients until smooth, then drizzle over the cooled bars.
Tips for Perfect Banana Bread Bars
Here are some expert insights to ensure your banana bread bars turn out perfect every time:
- Use Overripe Bananas: The more brown spots on your bananas, the sweeter they are! This ensures your bars will be moist and flavorful.
- Don’t Overmix: When combining the dry and wet ingredients, mix until just combined to avoid tough bars.
- Check for Doneness: Use a toothpick to check the center of the bars; it should come out clean or with a few moist crumbs.
- Cool Completely: Allow the bars to cool fully in the pan before slicing to prevent them from falling apart.
- Experiment with Flavors: Add in chocolate chips, nuts, or even a swirl of cinnamon for added flavor and texture.
- Storage: Store the bars in an airtight container at room temperature for up to 3 days or refrigerate for a week.
- Make Ahead: These bars freeze beautifully! Cut them into individual portions, wrap in foil, and freeze for up to 3 months.
- Glaze Variations: Try using almond butter or a date paste for a different glaze flavor.
Common Mistakes and Troubleshooting
Even the best bakers make mistakes! Here are some common issues and how to avoid them:
- Bars are too dry: This can happen if you overbake them. Keep an eye on the timer and do the toothpick test.
- Too mushy: Ensure your bananas are not overly ripe or you might end up with a batter that’s too wet. Adjust flour accordingly.
- Uneven baking: Make sure to spread the batter evenly in the pan and use the middle rack of the oven for even heat distribution.
Variations on the Classic Recipe
Feel free to customize your banana bread bars! Here are some delicious variations to try:
- Chocolate Chip Banana Bread Bars: Add ½ cup of dark chocolate chips to the batter for a sweet twist.
- Nutty Banana Bread Bars: Fold in ½ cup of chopped walnuts or pecans for added crunch and flavor.
- Coconut Banana Bread Bars: Incorporate ¼ cup of shredded coconut for a tropical flair.
- Spiced Banana Bread Bars: Add a pinch of nutmeg or ginger for a warm, spiced flavor profile.
Storage and Make-Ahead Instructions
These banana bread bars are perfect for meal prep or an on-the-go snack. Here’s how to store them properly:
- Room Temperature: Keep in an airtight container at room temperature for up to 3 days.
- Refrigeration: For longer storage, refrigerate in an airtight container for up to a week.
- Freezing: Wrap each bar tightly in plastic wrap and place in a freezer-safe bag for up to 3 months. Thaw at room temperature or microwave for a quick warm-up.
Frequently Asked Questions (FAQs)
Here are some common questions people have about making these delightful banana bread bars:
- Can I make this recipe vegan?: Yes! Substitute the egg with a flax egg (1 tablespoon flaxseed meal + 2.5 tablespoons water) and use maple syrup instead of honey.
- What can I use instead of oat flour?: You can substitute with whole wheat flour or almond flour, but the texture may vary slightly.
- How do I know when the bars are done baking?: The edges should be golden, and a toothpick inserted in the center should come out clean or with a few moist crumbs.
- Can I double the recipe?: Absolutely! Just use a larger baking dish and adjust the baking time accordingly.
- What toppings can I add?: Try adding chopped nuts, chocolate chips, or a sprinkle of cinnamon sugar on top before baking.
- Can I use frozen bananas?: Yes! Thaw and drain excess moisture before mashing and using in the recipe.
- Can I make these bars without peanut butter?: Yes, you can substitute it with almond butter or sunflower seed butter.
- What’s the best way to reheat these bars?: Microwave for 10-15 seconds or warm them in the oven at 350°F for a few minutes.
Nutritional Tips and Dietary Adaptations
This recipe is not only delicious but also packed with nutrition. Here are some tips to enhance its health benefits:
- Increase Protein: Consider adding a scoop of protein powder to the batter for an extra boost.
- Lower Sugar: Reduce the amount of honey or maple syrup if you prefer a less sweet bar.
- Gluten-Free Option: Use certified gluten-free oat flour and check other ingredients to ensure they are gluten-free.
- Low-Carb Alternative: Substitute oat flour with almond flour and use a sugar substitute to reduce carbs.
Equipment Recommendations
To make your baking experience smooth and enjoyable, here are some essential tools:
- Mixing Bowls: A set of mixing bowls in various sizes is crucial for prepping your ingredients.
- Spatula: A good spatula helps in mixing and spreading the batter evenly.
- Baking Dish: An 8×8 inch baking dish is perfect for this recipe, but you can also use a loaf pan.
- Parchment Paper: Line your baking dish with parchment for easy removal and cleanup.
- Measuring Cups and Spoons: Accurate measurements are key to perfect baking, so invest in a good set.
Serving Suggestions
These banana bread bars can be enjoyed in various delightful ways:
- With a Cup of Coffee: Pair your bars with a warm cup of coffee or tea for a cozy morning treat.
- With Fresh Fruit: Serve with slices of fresh fruit like strawberries or blueberries for a refreshing touch.
- As a Snack: Perfect for a midday snack or a post-workout treat, they’re wholesome and satisfying.
- With a Dollop of Yogurt: Add a scoop of Greek yogurt for a protein-packed breakfast option.
Conclusion: Create Your Sweet Memories
With this detailed guide, you’re well-equipped to create Healthy Cinnamon Roll Banana Bread Bars that not only taste wonderful but also fill your kitchen with warmth and nostalgia. Remember, baking is about more than just following a recipe; it’s about creating memories and sharing love through food. I can’t wait to hear how your baking adventures turn out! Happy baking!

Healthy Cinnamon Roll Banana Bread Bars with Peanut Butter Glaze
Ingredients
Method
- Preheat oven to 350°F (175°C) and line an 8×8 dish with parchment.
- Mash banana, then mix in peanut butter, honey, egg, and vanilla until smooth.
- Fold in oat flour, baking powder, and cinnamon until just combined.
- Spread batter evenly in the prepared dish and bake for 18-20 minutes.
- Mix glaze ingredients and drizzle over cooled bars before slicing.
Notes
Loved this recipe? Save it to your favorite Pinterest board so you can easily find it later! ✨
